Insight

Setting up AWS Cognito and React Native to enable Federated SSO: Part 2

Photo of Anthony Main

Anthony Main

founder

July 31, 2019

published

Part two: The frontend

Introduction

Previously, we explored how to set up Amazon Cognito User Pools to work with federated Single Sign-On (SSO), a critical feature for managing user authentication across multiple applications seamlessly. This integration ensures that user data is tracked consistently and securely, providing a unified experience regardless of which application the user interacts with.

Federated SSO also simplifies the authentication process by allowing users to log in via third-party providers like Google, Facebook, or enterprise solutions. However, this functionality is currently only accessible through the Hosted UI provided by Amazon Cognito, which simplifies the implementation but introduces new challenges.

The main issue we now face is that the redirection to the Hosted UI creates an undesirable user experience. While the Hosted UI is functional, it often feels disjointed and visually inconsistent with the branding of the application, leading to a clunky and unprofessional flow. Users are redirected from your application to Amazon's hosted page, which may not align with your app's design and aesthetic, causing frustration and potentially decreasing engagement.

The challenge moving forward is to improve this user experience by providing a seamless and visually cohesive login process, while still maintaining the robust security and functionality that Amazon Cognito offers.

In the next steps, we’ll explore how to retain the benefits of federated SSO while delivering a more polished, custom user interface that keeps users within the branded environment of the application.

Basic app setup

At The Distance we implement a React-Navigation authenticated stack as part of The Core framework. This allows us to control user flow and authentication. This, however, is out of scope for this blog and as such we are going to use a simpler method.

Installation

I am going to presume that you have React Native set up. If not, head on over to the React-Native Website.

Let’s generate a new project. Head over to the directory you want to generate the app in from the terminal and run:

$ react-native init CognitoExample

This will generate a project with the default React Native boilerplate. Create a new folder named ‘/Screens’ inside the ‘/src’ folder. In this folder we need a AuthenticatedScreen.js, SignInScreen.android.js and a SignInScreen.ios.js file. We will handle our sign up differently for both platforms.

Next create a new folder named ‘/Utils’ also inside ‘/src’. Create a new file named awsConfiguration.js.

Before we continue building our screens, we need to add our dependencies. In the project root folder run:

$ yarn add aws-amplify amazon-cognito-identity-js react-native-inappbrowser-reborn amazon-cognito-auth-js

$ react-native link react-native-inappbrowser-reborn

I’m not going to focus on styling in this guide, I’ll leave that up to you, but I will add some colour. First up, start with the AWSConfiguration.

Here we will need some of the details from Part One of this blog.

import { StorageHelper } from "@aws-amplify/core";

const storage = new StorageHelper().getStorage();

const awsConfiguration = {
  Auth: {
    region: ”eu-west-2”,
    userPoolId: ”eu-west-2_HTBSYrv6l”,
    userPoolWebClientId: ”7snsn7e3t77h0uennvevq1tgb8”,
    storage
  }
};

export default awsConfiguration;

Above is my User Pool configuration. Note here that we manually set up our storage object. This is important so that when we use amazon-cognito-identity-js later, not aws-amplify, our users are stored in the correct place. We will configure Amplify later.

Next, set up our SignInScreen screens. This file will be the default file for our app when not authenticated. 

Building the screens

Recently Apple has employed a stance on social login that WKWebView is not secure enough. Instead we must use SafariViewController which is available to us through react-native-InAppBrowser-reborn.

First, the imports and some basic formatting:

import React from ‘react’;
Import { View, SafeAreaView, Text, TouchableOpacity, Linking } from ‘react-native’;
import InAppBrowser from 'react-native-inappbrowser-reborn’;
Import { Auth } from ‘aws-amplify’;
import { CognitoAuth } from "amazon-cognito-auth-js";

const settings = {
  container: {
    style: {
      flex: 1,
      backgroundColor: '#631D76',
      justifyContent: 'center',
      alignItems: 'center'
    }
  },
  button: {
    style: {
      borderWidth: 2,
      borderColor: '#832161',
      borderRadius: 10,
      width: '80%',
      height: 50,
      alignItems: 'center',
      justifyContent: 'center',
      backgroundColor: '#832161',
      shadowColor: '#000',
      shadowOffset: {
        width: 0,
        height: 2
      },
      shadowOpacity: 0.25,
      shadowRadius: 3.84,

      elevation: 5
    }
  },
  buttonText: {
    style: {
      color: 'white'
    }
  },
  title: {
    style: {
      color: 'white',
      fontSize: 28,
      fontWeight: '600',
      textAlign: 'center',
      marginBottom: 150
    }
  }
};

class SignInScreen extends React.Component {
  render() {
    return (
      <SafeAreaView {...settings.container}>
        <View>
          <Text {...settings.title}>Cognito Authentication Example</Text>
        </View>
        <TouchableOpacity {...settings.button}>
          <Text {...settings.buttonText}>I'm a button</Text>
        </TouchableOpacity>
      </SafeAreaView>
    );
  }
}

export default SignInScreen;

Add the same to SignInScreen.android.js.

With the design of our SignInScreens done, lets add them to our App.js file and configure the screens and AWS to handle our authentication. First, clear out the App.js file and add the SignInScreen so it looks like this:

/**
 * Sample React Native App
 * https://github.com/facebook/react-native
 *
 * @format
 * @flow
 */

import React from "react";
import SignInScreen from "./src/Screens/SignInScreen";
import awsConfiguration from './src/Utils/awsConfiguration';
import Amplify from 'aws-amplify';

const App = () => {
  return <SignInScreen />;
};

export default App;

Note that I added two new imports to the file. We must configure amplify to use our AWS configuration object. Above the return block add:


Amplify.configure(awsConfiguration);

Now I’m going to implement a simple switch for unauthenticated and authenticated users. Replace the App function to look like:

class App extends React.Component {
  state = {
    authenticated: false
  };

  render() {
    if (this.state.authenticated) {
      return <Authenticated />;
    }
    return <SignInScreen toAuthenticated={() => this.setState({ authenticated: true })} />;
   }
}

Here we’ve created a state field named authenticated and based on this property we are displaying one of two files. Because we currently only have a SignInScreen this is set to false. The other thing to note here is that we have passed a prop to SignInScreen which sets authenticated to true.

Let’s actually handle the authentication. As mentioned previously, Apple now requires us to use SafariViewController and in turn react-native-InAppBrowser-reborn. We will focus on iOS as Android can be achieved in a number of different manners.

In SignInScreen.ios.js add the code to handle redirection to the app. We will need an App URL Scheme. To set this up:

  • Edit the Info.plist
  • Add ‘URL types’ as a row
  • Add a row to ‘URL types’ called ‘URL Identifier’. This is usually the same as your bundle id
  • Add another row to ‘URL types’ called ‘URL Schemes’.
  • Add an item as the name of your scheme. E.g. myapp will be used as myapp://

First we need to handle the redirection. This is done in componentDidMount() by adding listeners for AppState changes.

componentDidMount() {
    // this handles the case where the app is closed and is launched via Universal Linking.
    Linking.getInitialURL()
      .then(url => {
        console.log("I am in the get initial url");
        if (url) {
          Alert.alert("GET INIT URL", `initial url  ${url}`);
          console.log("GET INIT URL", `initial url  ${url}`);
          // this.resetStackToProperRoute(url);
        }
      })
      .catch(e => {});

    // This listener handles the case where the app is woken up from the Universal or Deep Linking
    Linking.addEventListener("url", this.appWokeUp);
}

componentWillUnmount() {
    Linking.removeEventListener("url", this.appWokeUp);
  }

We now require a number of different functions to handle sign in and redirection from cognito. First of all, we are going to open the Hosted UI directly on Facebook’s log in screen. Add this code to the onPress of the TouchableOpacity.

Adding the web browser

() => InAppBrowser

   .open(`https://example-sso.auth.eu-west-2.amazoncognito.com/login?redirect_uri=http://localhost:3000&response_type=code&client_id=7snsn7e3t77h0uennvevq1tgb8&identity_provider=Facebook`)
   .catch(error => {console.log(error);})

This is the same URL we generated at the end of Part One however we have added the identity_provider=Facebook property to the end.

At this point the file should look like this:

import React from 'react';
import { View, SafeAreaView, Text, TouchableOpacity, Linking } from 'react-native';
import InAppBrowser from 'react-native-inappbrowser-reborn';
import { Auth } from 'aws-amplify';
import { CognitoAuth } from 'amazon-cognito-auth-js';

const settings = {
  container: {
    style: {
      flex: 1,
      backgroundColor: '#631D76',
      justifyContent: 'center',
      alignItems: 'center'
    }
  },
  button: {
    style: {
      borderWidth: 2,
      borderColor: '#832161',
      borderRadius: 10,
      width: '80%',
      height: 50,
      alignItems: 'center',
      justifyContent: 'center',
      backgroundColor: '#832161',
      shadowColor: '#000',
      shadowOffset: {
        width: 0,
        height: 2
      },
      shadowOpacity: 0.25,
      shadowRadius: 3.84,

      elevation: 5
  },
  onPress: () =>
      InAppBrowser.open(

`https://example-sso.auth.eu-west-2.amazoncognito.com/login?redirect_uri=http://localhost:3000&response_type=code&client_id=7snsn7e3t77h0uennvevq1tgb8&identity_provider=Facebook`
      ).catch(error => {
        console.log(error);
      })
  },
  buttonText: {
    style: {
      color: 'white'
    }
  },
  title: {
    style: {
      color: 'white',
      fontSize: 28,
      fontWeight: '600',
      textAlign: 'center',
      marginBottom: 150
    }
  }
};

class SignInScreen extends React.Component {
  render() {
    return (
      <SafeAreaView {...settings.container}>
        <View>
          <Text {...settings.title}>Cognito Authentication Example</Text>
        </View>
        <TouchableOpacity {...settings.button}>
          <Text {...settings.buttonText}>Login With Facebook</Text>
        </TouchableOpacity>
      </SafeAreaView>
    );
  }
}

export default SignInScreen;

To set up Cognito we need to Cognito Auth which is not provided to us by Amplify. Above our class under the imports add:

/* Social Login Setup */

CognitoAuth.prototype.createCORSRequest = function (method, url) {
    const xhr = new window.XMLHttpRequest();
    xhr.open(method, url, true);
    return xhr;
};

if (!global.atob) {
    global.atob = base64.decode;
}

const cognitoAuthParams = {
    ClientId: awsConfiguration.Auth.userPoolWebClientId,
    UserPoolId: awsConfiguration.Auth.userPoolId,
    AppWebDomain: "example-sso.auth.eu-west-2.amazoncognito.com",
    TokenScopesArray: [
        "email",
        "profile",
        "openid",
        "aws.cognito.signin.user.admin"
    ],
    RedirectUriSignIn: "myapp://",
    RedirectUriSignOut: "myapp://",
    Storage: awsConfiguration.Auth.storage
};

Then in the constructor of the class add:

this.cognitoAuthClient = new CognitoAuth(cognitoAuthParams);
    this.cognitoAuthClient.userhandler = {
      onSuccess: async result => {
        this.handleSignInSuccess();
      },
      onFailure: err => {
        console.log(err, "Sign in error");
      }
    };

Handling redirection

Next add these functions:

1.

appWokeUp = event => {
   // this handles the use case where the app is running in the background and is activated by the listener...
   // Alert.alert("Linking Listener", `url  ${event.url}`);
   InAppBrowser.close();
   console.log(event);
   this.handleBrowserNavigation(event);
 };

2.

handleBrowserNavigation = webViewState => {
   console.log(webViewState);
   const formattedURL = webViewState.url.split(
     "myapp://?code"
   )[1];
   this.handleSocialSignIn(formattedURL);
   // if (webViewState.url.includes("?code")) {
   //   this.handleWebViewClose();
   // }
 };

3.

handleSocialSignIn = async callbackURL => {
   const connected = await this.isConnected();
   if (connected !== true) {
     this.handleError("Network");
     return;
   }
   // console.log(Auth._config);
   try {
     const AmplifyUser = await Auth.currentAuthenticatedUser();
     console.log("\nUSER ALREADY LOGGED IN");

     this.handleSignInSuccess();

     return AmplifyUser;
   } catch (e) {
     try {
       console.log(callbackURL);
       await this.cognitoAuthClient.parseCognitoWebResponse(callbackURL);
       try {
         await this.handleSignInSuccess();
       } catch (err) {
         if (this.state.retry === false) {
           this.setState({
             retry: true
           });
           this.handleSocialSignIn();
         } else {
           throw err;
         }
       }
     } catch (err) {
       if (this.state.retry === false) {
         this.setState({
           retry: true
         });
         this.handleSocialSignIn();
       }
       console.log(err, "HANDLESOCIALLOGIN ERROR");
       console.log(AsyncStorage.getAllKeys(), "Async");
       return false;
     }
   }
 };

4.

handleSignInSuccess = async () => {
   console.log("Sign in success");
   this.props.toAuthenticated()
}
 

Updating cognito to match URL scheme

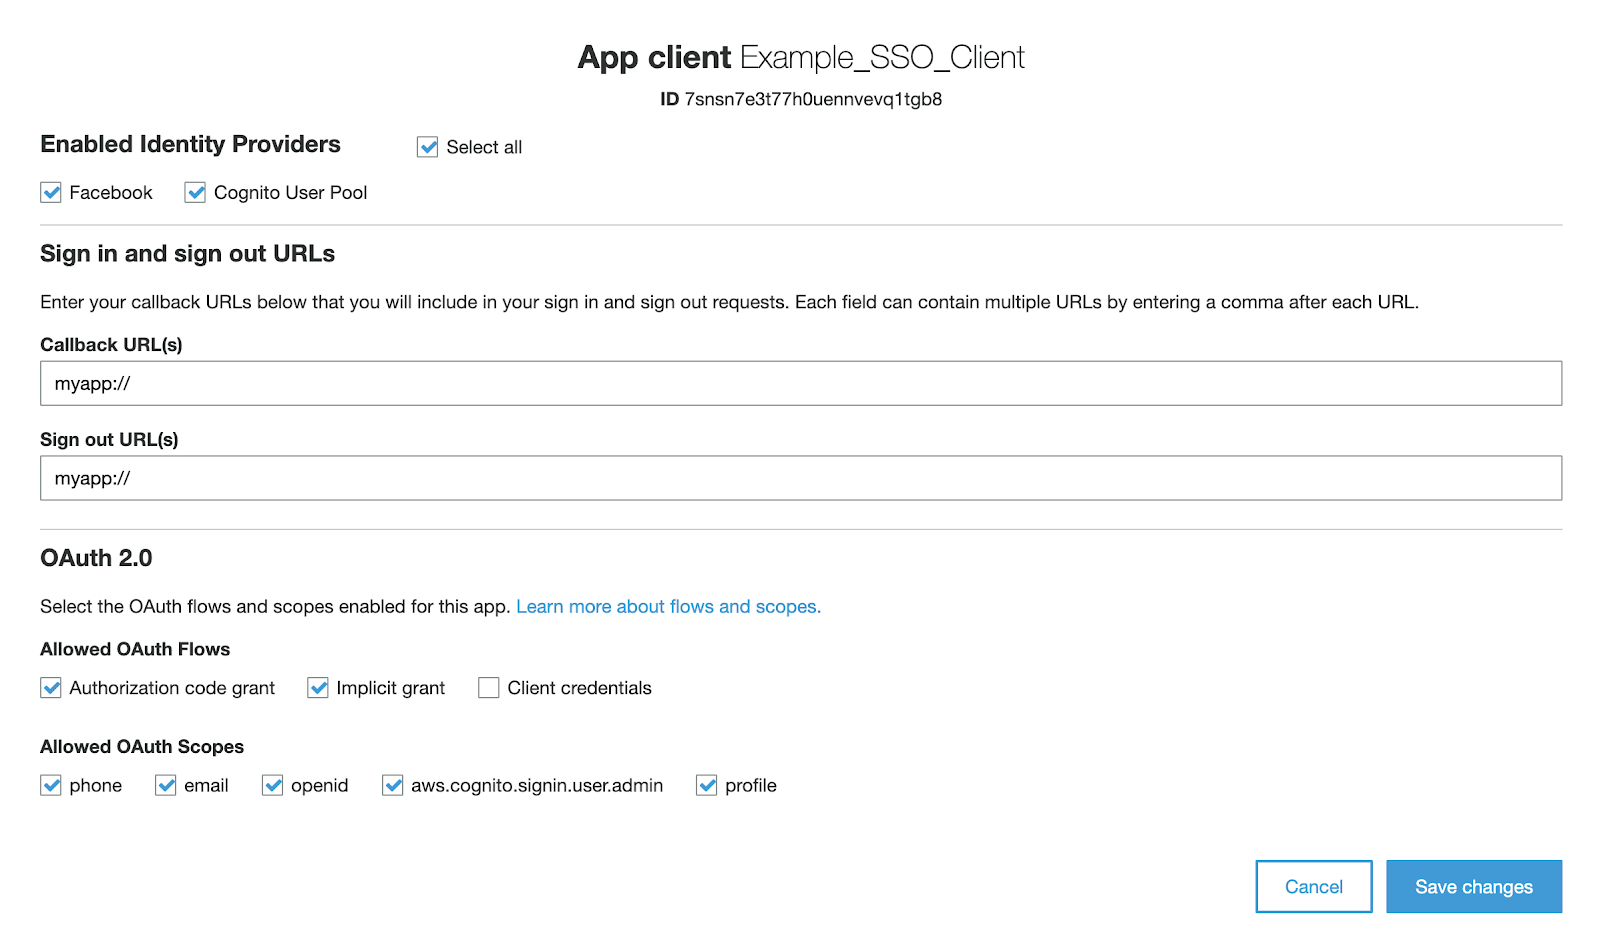
And that’s it for the SignInScreen. The only thing we need to do is update our redirectURL’s in Cognito as show in the image:

Now we have successfully updated and redirected the user to the Authentication page we get an error that the Authentication doesn’t exist. You can do whatever you like with this page. I suggest creating a simple component to test and then experiment with the data that can be returned from Auth in creating a profile page.

Image

Ready to take your app's authentication to the next level? Let us help you implement a seamless, secure React-Native application with AWS Cognito.

 
contact us

Apply theses insights

Contact us to discuss how we can apply theses insights to your project